Many athletes involved in various sporting activities today use alternative training methods to improve their performance. Due to the cardiovascular fitness and dynamic nature of mountain biking, there are many cross training methods that can be used to enhance your ride. having an alternate sport also helps you to keep your mind fresh, reducing "burnout". Cross training is especially useful if you live in an area where mountain biking has an off season due to the weather because it keeps you fit and will give you a leg up on the competition come spring time! I have created a list of activities that correspond well to mountain biking:
- road cycling. I thought I might put forward the most obvious cross training method first. Road cycling is a great way to build your endurance and condition cycling specific muscles. It is less taxing on your body than mountain biking so it can be a good form of recovery as well. Many professional mountain bikers actually spend about 70% of their training time on their road bikes.
- rowing. rowing is a great exercise for strengthening your arms, back and legs which are three important areas for mountain bikers. Rowers actually have one of the largest lung capacities in the sporting world which demonstrates the cardiovascular advantages you can gain from the sport, on top of the muscle development.
- running. running is fantastic for improving your cardiovascular fitness and increasing your max Vo2. The impact nature of running strengthens your legs and joints as well. Trail running is even more advantageous because the dirt is easier on your joints and obstacles gives you an added level of conditioning and joint stability.
- basketball. if you find running by yourself boring, you can get involved in a sport like basketball where running is fun! You can get the same effect with other sports like hockey or soccer (indoor or outdoor), just so long as your running and working hard.
- swimming. swimming strengthens your lungs which convert to big improvements on the bike. it is also great for strengthening your upper body.
- weight training. weight training is great for mountain bikers as it can help you push bigger gears, climb hills and control the bike. When you weight train, it is important to include all muscle groups and not just concentrate on your legs otherwise you will become heavily imbalanced. On the trail, you are practically using all of your muscle groups so strengthening these are pretty useful.
the sports I listed above aren't the only cross training methods and are just some ideas. you can include other sports like cross country skiing, down hill skiing, down hill mountain biking, hiking etc. just so long as you are working!

Monday, March 31, 2008
Sunday, March 30, 2008
Make Your Bike Faster! UPDATED!
 When you get your hands on a brand new bike the suspension is plush, the gears are smooth and the whole machine just feels great. How do we keep this level of performance? The answer largely comes to keeping it clean. When we ride off road, abraisive dirt and grime attatches itself to your bike, concentrating in and around the moving parts, accelerating wear and decreasing performance. When the drivetrain and moving pars are free of cruddy dirt, the chain and derailleurs dont have to work as hard to change gears, the dust seals on your bearings and suspension are under less pressure and your bike looks nicer! Here's how to do it:
Tools of the trade
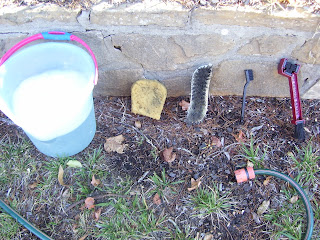
- bucket
- warm water
- garden hose
- simple detergent (I like to use dishwashing liquid)
- sponge
- stiff bristled brush (eg. washing up brush)
- any other brushes that you see fit (eg. tooth brush to get into the nooks and crannies)
- give your bike a quick rinse with the garden hose to remove most of the loose debris. It is important that the water pressure is no more than a rainshower as high pressure water will force past the seals in your suspension, hubs, bottom bracket and headset, damaging the components (see useful hints for a way to give these parts extra protection).
- put some detergent and warm water an a bucket and begin to sponge bath the bike, from top to bottom. clean down the suspension sliders and around the headset, not forgeting the bottom bracket. Sponge down the rims and hubs as well. Using one hand to hold the cranks steady, scrub the rear cassette cogs and then move onto the front chainrings. While your bending over, scrub the chain, front and rear derailleurs as well as the pedals.
- now that your bike is covered in soapy suds, grab the garden hose and begin to rinse it off. Remember to keep the pressure low.
- now that the bike is sparkling clean, bounce or shake it a couple of times to rattle of most of the water. You may also like to wipe it down with a dry towel. Alternitavely you can take it for a brisk 1-2 minute ride to blow the water off, however this may cause dirt to fly from the tyres onto the bike again.
- when the bike is dry, lubricate the chain and cables appropriately
Useful hints
- Aim to clean your bike after about every 2-3 hours of riding
- you can easily clean down your suspension sliders with a rag or with the back of your gloves which will reduce pressure on the dust seals
- most mountain bikes these days have pretty decent seals on the bearings, however if you are paranoid that water will force through, tie some rags around them for extra protection.
- you can use degreaser on your chain and cogs to make the drivetrain extra clean. Aim to keep it on the chain and cogs only to prevent it getting into any sealed units.
- don't put any chamicals (lubricant, degreaser etc) on the brake pads or braking surfaces as this will contaminate them, greatly reducing brake performance.

Having a clean bike feels great and will increase it's life dramatically.
Friday, March 28, 2008
cycling fitness basics
Before I start getting into any articles about fitness, I thought I'd provide you with the basic elements of the topic.
There are three main training phases that a cyclist or mountain biker needs to understand being base, build and competition/peak:
There are three main training phases that a cyclist or mountain biker needs to understand being base, build and competition/peak:
- Base - the base phase is where you lay out your foundation of aerobic fitness before any high intensity training is taken place. Base training basically includes spending most of your time working on endurance rides at a low intensity (65-70% of maximum heart rate if you have a heart rate monitor). Building your base provides most of your endurance for later in the season and without it your improvements will be dramatically limited. Time spent in the base phase depends on your goals for the season. The longer you spend in the base phase the larger your potential for the season; aim for somewhere between 3 weeks and 3 months. It is useful to develop your base either on road on an indoor trainer as it provides less interruptions with your heart rate and rhythm.
- Build - once you have built your foundation in the base phase it is time to start to ramp up the intensity. Here it is also useful to suppliment with strength/resistance training. Sessions in the build phase can include intervals, hill starts and pace rides. It is a good idea to start with your workouts having longer and less intense efforts and gradually work your way up to shorter, harder intensities.
- competition/peak - this is where all of your hard work troughout the season pays off. Your workouts should be short and sharp focusing mostly on speed and high intensity. If you executed your base and build phases correctly, you will find that at this stage you should notice a difference in performance. Your body can unfortunately keep this sort of peak condition for a limited time from 2-4 weeks, so it is important to time your program so you are peaking at an important race or event. Riders often feel that they are losing fitness through this phase, but if you peak correctly you will reap the rewards.
- restoration phase - at the end of your program, after the competition phase, it is important to give your body a rest to rebuild and recover. Depending on your condition and calander this phase should last between two weeks and two months. In this time avoid having a junk food blow out accompanying plenty of couch time and try to continue to eat well and include some gentle exercise like swimming, walking etc. The restoration phase is also used to recover your mind making you motivated to train when you finish resoring.
The overload principle
The overload principle entails gradually increasing work (duration, intensity, weight etc.) over a period of time. This should be used in your base, build and any weight/resistance training you may be doing. For example, in your base phase you should be aiming to increase the duration of your rides by about 10% each week, in the build phase you should be increasing intensity each week and so on... In the competition phase however, you need to do the opposite by reducing training volume by 10 % each week. This will allow your body to rebuild and "taper".
Recovery
It is important to add recovery into your training schedule to prevent "burnout" and allow time for your body to adapt. Every 3-4 weeks back off the training slightly to allow for a bit of extra recovery. Remember that it is in recovery your fitness improves due to your body rebuilding and adapting to the exercise.
Thursday, March 27, 2008
Ride Slow to Ride Fast
When you think about it, going fast on a bike is easy. A lot of the time, the hardest part of riding trails is going slow. If you have slowed right down, it means that you have come to a piece of trail that is very technically demanding and riding it too fast will lead to crashing your brains out! However if you can improve your slow riding skills, you will find yourself exiting these technical sections faster, smoother and safer.
The drill used to practice your slow riding skills is called the track stand. The track stand is seen as balancing in a stationary position on your bike and can look pretty impressive through the eyes of onlookers.
To perform a track stand there are a few things you need to keep in mind:
- In a track stand you are not actually keeping completely still. In fact you are constantly moving, rocking back and forward. When you are beginning your rocks can be bigger and more obvious and you will find that with improvement you will be able to keep your movements much tighter and controlled.
- Off the brakes! Being off the brakes will make the rocking action a lot easier.
- keep your head up. How often do you ride your bike looking at the ground beneath you? Keeping your head up helps to simulate trail conditions where you need to be switched on and scanning for the next obstacle.
It is often easier to begin on a slight gradient with your front wheel pointing up hill. Get yourself in a gear that allows you to have some tension on the chain without being too light or too heavy. Standing on the pedals, put your favourite foot forward in about the 9 o’clock position and gently apply and release pressure to give you a calm rocking motion. It may also help if you turn your handlebars to one side.
Advanced techniques
If you start mastering the basic track stand you can begin to take off one hand, one leg, two legs etc. Trying a track stand sitting down also adds some extra difficulty and is handy of you can do it right. You may even want to venture into some trials riding where your skills will be put to the ultimate test. Stay tuned for a beginning trials post.
How the track stand will improve your riding
The track stand is the most fundamental skill on a bike. If you can perform a track stand well, you are definitely on our way to being a more skilled, faster and safer rider. Even after about a weeks practice, I have found that my stability at high speed had improved greatly, my skills through technical terrain were better and since improving my track stand I have been crashing much less! Learning the track stand at first can sometimes be slow and frustrating, however the rewards are defiantly worth the time spent practising.
Monday, March 24, 2008
BMX Track Riding For Supreme Singletrack Skills
Riding BMX tracks/pump tracks are a great way to make you a smoother, safer and faster mountain biker. I have spent a lot of time riding local BMX tracks and have found that it has greatly enhanced my control over the bike by improving confidence, weight and balance over the bike, jumping skills and fluidity through singletrack.
Getting started
The easiest and best way to get started is to grab some friends and head down to the local BMX track. If you don't have any BMX tracks in your area you can try to find a pump track or even build your own! (I wont be getting into trail building this issue but stay tuned!) Having friends with you can speed your skills improvements by having someone to compete with, someone check your form and friends makes it alot more fun.
Drills and techniques
Once you become well aquainted with the track, you can start practising pumping technique:
- keep your head up - like all mountain bike situations, you should have your head up, scanning the terrain ahead so you can become familliar with what's comming up.
- body movements - you need to be active on the bike by moving both up and down and forwards and backwards. You need to achieve this by pumping your arms and legs in a rhythm with the humps on the track. As you increase in speed, your pumping action will need to be faster and more dynamic.
- body separation - in the pumping action, you need to use your upper body's full range of motion to maintain your front wheel's contact with the ground. You will find that your arms will be pumping up and down rapidly as you increase speed. Your legs should be reletively quiet compared to your arms but still needs to be active in pumping and maintaining traction with the riding surface. In the pumping action you are aiming to push your wheels overand down the humps in a fluid motion, linking your upper and lower body movements which will increase in speed as you go.
A great way to improve your pumping technique is to practice going through the entire BMX track without peddling, only pumping. You can also race your buddies and you will see that an increase in your distance and speed are a sign of your improvement.
Practice jumping your bike by hitting the kicker with appropriate speed and landing smoothly on the down ramp on the other side. I reccomend starting on tabletops as it is easier to land safely if you don't make the distance. when your skills and confidence improves, you can step up to some of the bigger jumps.
Equipment
All you really need is a bike and a helmet to start riding BMX tracks. However, when you start jumping, you may want to enclude some extra armour in case you fall; it may also give you the confidence needed to get you over the gap. If you find a hidden talent in BMX track riding you can grab a dirt jump bike and continue your quest to international 4X victory! The compact frame and slack geometry are well siuted for quick manuvers at BMX tracks giving you a better grasp on jumps and humps. I am comfortable using my XC hardtail as I fell confident riding it and it makes it easier to transfer skills from the track to the trails.
How BMX track riding will improve your mountain biking
Pumping through BMX tracks are all about increasing momentum and holding traction which are two very important aspects of mountian biking. The more you practice pumping, the more you will use it in singletrack situations. Your emprovements in holding traction will make you better at cornering and the fluid pumping action will make you a more fluid rider. Combine small hops and pumping through root infested trails to hold speed, traction and fluidity.
Getting some air at the BMX is very useful for improving your confidence and areal awareness. you will learn to spot landings mid-air and execute them smoothly. practising landing on a transition (down ramp) will greatly improve your smoothness and safety when jumping on the trail. There are many situations where jumping in the singletrack is faster, smoother and safer; especially when you have the skills to do it! Having the ability to jump with confidence opens up a world of new lines that you can ride adding to your performance and the enjoyment of the ride.
welcome
Welcome to my blog! Here I will regularly post articles based on mountainbike fitness, technique, tech and culture as well as sharing some of my own personal riding stories and experiences. I am an experienced mountain biker and have a great passion for the sport, as well as an array of others including basketball, downhill skiing and running.
Please feel free to leave your thoughts, suggestions and riding tips as they are more than welcome.
Please feel free to leave your thoughts, suggestions and riding tips as they are more than welcome.
Subscribe to:
Posts (Atom)